|
concepts - sequencer - lcd display - edit steps - record realtime - recording from midi - step & gate length - play mode - quickresults - side notes - signal flow - download
You can use a MIDI file to program the sequencer of the MC-202.
As long as the MIDI file does not contain chords, you can record these monophonic sequences into each Channel of the MC-202.
You need a MIDI Sequencer software on a computer or tablet, like the Cubasis DAW for the iPad.
And you need
a converter for the MC-202 signals, like a KENTON MIDI to CV/Gate.
Then Play the monophonic MIDI Track from the DAW and record it into the MC-202 sequencer.
Is it that easy? Yup. Read on.
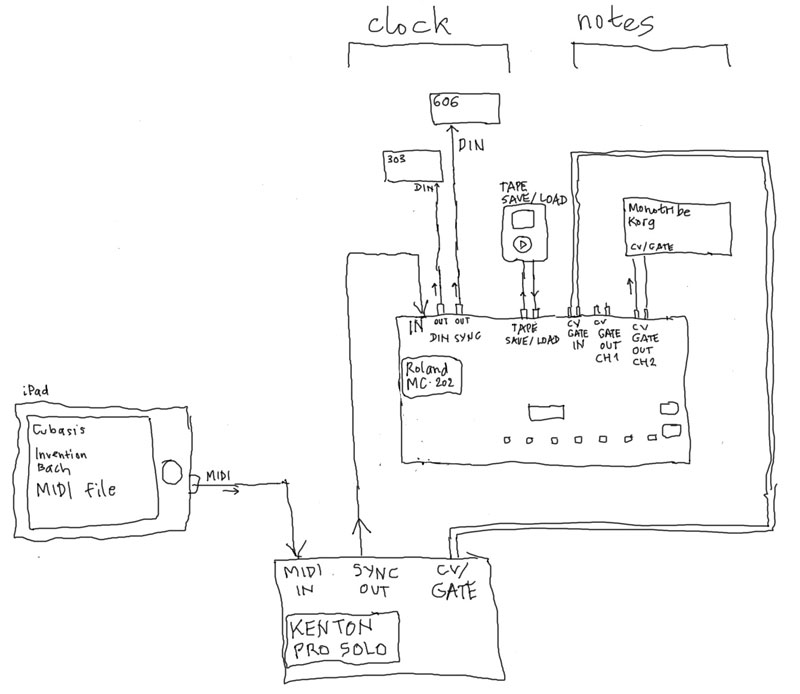
You record the 2 Tracks in the MC-202 one after the other. You need to convert the MIDI signal as follows:
-
MIDI to DIN-Sync for the tempo
-
MIDI to CV/Gate for the melody
|
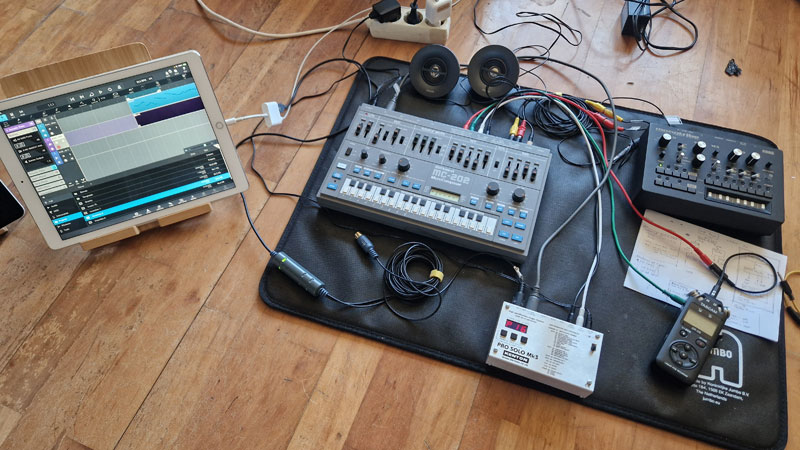
I used Cubasis on the iPad with a USB MIDI interface. Should work with any DAW that sends MIDI.
You could even use Cakewalk 1 on Windows 95, or Cubase 1 on an Apple Mac Classic.
For MIDI files containing 2 monophonic tracks, you can try one of J.S. Bach's "Inventions". The MIDI Files are available on bachcentral.com for downloading.
See the download page to download the results.
Probably the biggest hurdle you have to take in the process is to find a cable that carries the DIN-Sync signal.
Most of the "modern" MIDI cables don't, because the pins used for DIN Signals are not connected.
 |
Sidenote: how to get the MIDI files into Cubasis - download the MIDI files from the web and save to iCloud - iPad Files app: long press 1 MIDI file, tap Share, select Cubasis (multiple file selection do'nt work) - in Cubasis, create new Project: press MEDIA (left top), bottom: Projects > NEW PROJECT > "Name" > CREATE - Import MIDI into Project: MEDIA > MIDI > My MIDI Files > double tap the MIDI file - adjust BPM 50, 4/4 time, and then move both Tracks 2 Measures to the right - tap Track 1 to select it, open "Routing" tab, change "No MIDI Output" to your MIDI port, and "Ch 1" to ALL - tap Track 2, check if "No MIDI Output" is active - done |
Let's start.
| Prepare the connections |
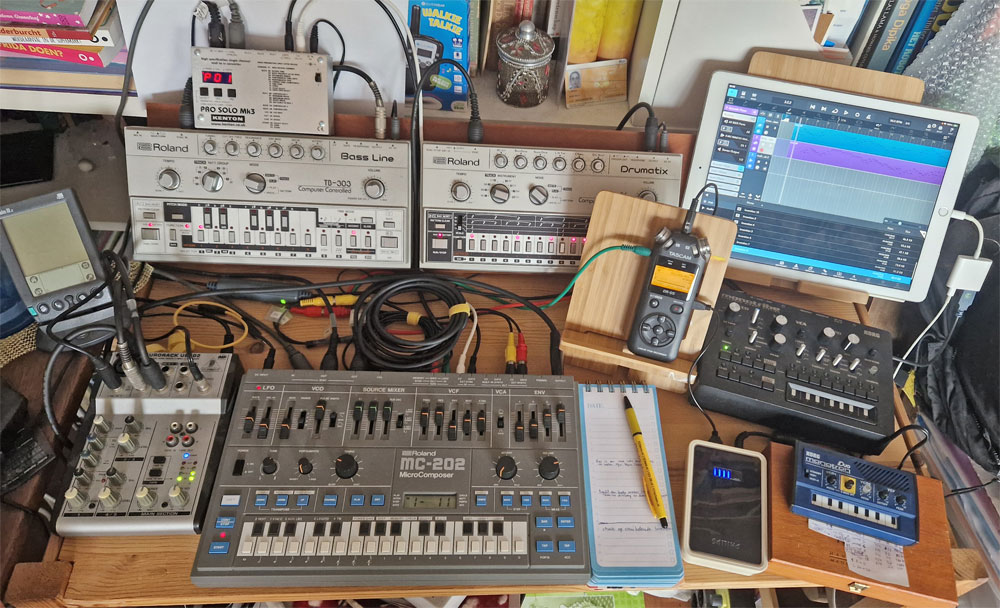
| - connect USB MIDI from the iPad DAW to the KENTON - connect the SYNC24 port of the KENTON to the MC-202 SYNC IN port - connect the CV and GATE of the KENTON to the MC-202 EXT KBD IN CV and GATE ports - connect he second synth to EXT SYNTH CV/Gate. I used to KORG Monotribe. - connect speakers to the MC-202 - also connect the MC-202 TAPE MEMORY SAVE/LOAD to a sound recorder, I used a TASCAM Field Recorder. |
| Prepare the MIDI file in your DAW |
| - import the MID file - create 2 extra blank Count-in measures before the start of the Track, because the MC-202 has a "Count in" BEEP of 2 Measures. - check if you need to Transpose the Track up or down (the MC-202 does not accept too high Notes). - set the tempo to 50 (nice and slow) - send only the current Track to the MIDI interface, Channel "ALL" - for the other Tracks in your DAW: set MIDI OUT to "None" |
| It's very nice that the MC-202 quantizes the incoming Notes, because CV/Gate can sometimes be a little bit "unstable". The MC-202 will internally correct this to the nearest note. |
| Prepare the MC-202 |
| - switch on the MC-202 - check if the MC-202 is in EDIT PITCH mode. - check if Channel 1 is active. |
| Arm the MC-202 for recording |
| - While Holding SHIFT, Press "REALTIME", optionally change the Measure length (default 4/4) and then press the "START" button. - at the press of "START" you do not get any notification: no beep, no screen change. - release the SHIFT button. - the MC-202 now patiently waits for the Start signal from your DAW. |
| Start your DAW |
| - Press Play in your DAW - > the playback head starts with 2 Measures of silence - > MC202 starts BEEPing in time and starts the 2 Measures of "Count In" before it starts recording - the TEMPO knob on the MC-202 does not respond, because the timing is controlled from the DIN Sync.. |
| Do not worry about the timing of Notes during recording. Or the timing of the Beeps. After recording of the 2 Channels, the timing of the internal and external CV/Gate signals will be perfect in Sync. However, the DIN Sync is a bit off. So if you plan to DIN Sync to other gear, you have to make a small correction to the STEP time of the first note of both Channels. You have to move to first Note to the correct spot of the DIN Sync clock. |
| When the Track is finished |
| - keep playing the file in your DAW - first press STOP on the MC202. The 202 drops out of recording at the end of the current Measure, but still needs the DIN Sync for it. - when the 202 has stopped, you can stop the playback of your DAW - recording of this Track is done. |
| Record the second Track |
| - switch to Channel 2 (Press CHANNEL button once) - also switch the MIDI OUT Channel in your DAW to the second Track and disable the MIDI interface for the first Track - while recording to Channel 2, the MC-202 sends out the CV/Gate of Channel 1 to your external synth |
| Repeat the above steps for recording of Channel 2. |
| Listen to the results |
| - press the blue PLAY button to change the MC-202 mode from recording to playing. - remove the DIN Sync cable so the Clock and Start/Stop can be controlled with the MC-202, - press START and enjoy. |
| Adjustments for synchronizing to DIN Sync gear |
| When I hooked up my TR-606 to the DIN Sync of the MC-202, I noticed the MC-202 notes were a bit too early. So I had to add an offset of 4 "ticks" to the STEP time of the first Note for both of the Channels of the MC-202. This adjusted the Notes to the DIN Sync start time. Just push both Channels an amount of 4 ticks forward by adding an amount of "4" to the STEP time of the first Note for both Channels. You can use this technique as a solution, because the sequencer is not Pattern based (like the TB-303/TR-606). The MC-202 sequencer just records a continuous stream of notes, like the SH-101. And you can offset the whole sequence, by changing the length of the first note. Very convenient. Example: - the STEP time of the first note on Channel 1 was 8. After changing the STEP to 12, the Channel was DIN Sync perfect. also I changed the GATE time from 7 to 11 for a longer sounding Note. - the first Note of the second Channel was a Rest Note (GATE=0), with a STEP of 140. Add 4, so this changed to 144. How to Edit: - see the "Edit Steps" page to change the STEP time. It's not that hard to do. - and maybe the GATE time too (for "Rest" notes, however, you only change the STEP time!). |
| Save the MC-202 Memory to Tape |
| The MC-202 MEMORY SAVE audio Port puts out a constant tone. This way you can adjust the recording level of your recording device, even before you start saving. Recording should be loud, but don't let the signal clip. The "Peak" LED should never flash. |
| - while Holding Shift, press "SAVE" - if you like, you can now enter a file number between 0 and 999, - then start the Recording on your sound recorder and then press ENTER on the MC-202. - Saving starts. - release the SHIFT button. - the MC-202 BEEPs when Saving has finished. |
| File number: - the file number will be shown when you load a file into the MC-202. - you can use it to show the number of Measures in this song, or the suggested BPM, or upside down text like LOL, ShE, hIS, ZOO, hEL. |
| Check the recording (the hard way) |
| - switch off the MC-202, switch it back on. The memory is now empty. - press the blue PLAY button to switch from recording to playing. - while Holding Shift, press LOAD, then start the audio playback of your recorder, - > press ENTER on the MC-202 within 10 seconds after the start of the signal. - release the Shift button. |
| Verifying "the soft way" is to use the VERIFY function, which does not destroy your work. |
| The 202 drops out of Loading... |
| - when you release the Shift button before you have pressed ENTER. - when the 202 does not detect a tone on the MEMORY LOAD port after you pressed ENTER. - when there is a Loading error. You will hear 3 fast beeps when the Loading has failed. - when Loading is successfully done. |
Now hook up your TB-303 and TR-606 to the 2 DIN SYNC OUT ports and have fun!
| Failures The Arturia Keystep Keyboard looked very promising in providing the conversion from MIDI to CV/Gate and DIN Sync. It sends CV/Gate and DIN Sync signals, and it also converts the incoming MIDI Notes to CV/Gate perfectly. But only as long as you use the Internal Clock. As soon as you switch the Keystep to the external MIDI Clock (the clock of your DAW), it stops converting the MIDI Notes to CV/Gate. Only the keyboard keys are sent to the CV/Gate. So that was the end of the line. Then I used the MIDI tot CV/Gate conversion of the Novation Bass Station Rack. That CV signal proved to be so unstable, I gave up. Then I used the Doepfer MSY2 MIDI to DIN Sync converter box. That box appeared to have stopped functioning. The LEDs are on, but no clock, and no start/stop to DIN. Unfortunately. Luckily the Kenton Pro Solo converter did all the work perfectly. |
Workaround
If you can not find or solder a DIN Sync cable, you can always use "MC-202 Hack", for which you only need the Tape Load and Save ports of the 202.