|
start | front panel programming | 8 parts sequencer | 4 tones synth | rhythm part | vco samples | mc505 editor
Start up the editor
- there are 3 Tabs: Tone, Common/Mod/Part/Scale, MIDI & Setup
- the Tone-screen is different for PART R
- you can not edit the sequencer

Title bar
- Name of the software
-
Part being edited: "<P1> .. <P7>" or "<Part> R"
- name of the Patch
- WAVE [ON] or [OFF] for every Tone (title bar updates after switching "Show Tone")
Main screen
- some of the values contain tooltips
Status bar
- 1st row: shows values under the mouse pointer for all 4 Tones, and whether this value can be randomized (Menu: Utility > Shake patch)
- 2nd row: shows the tooltip, when available
![]()
Connect a keyboard MIDI OUT and the PC MIDI OUT to the MIDI IN of the D2 (use a MIDI merger).
Connect the MIDI OUT of the D2 to the PC.
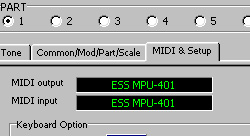
PC: Choose the right MIDI interface on your PC:
-
open Tab "MIDI & Setup" in the Editor and select the interface to which the D2 is connected.
Every single one of the 8 PARTS on the D2 can contain a Patch. But what will your hear when you play the MIDI keyboard?
Good question.

Actually, you can decide for yourself what you will hear. Press the SYSTEM key until the RX (MIDI Reception) LED lights up.
Using the dial, set "ACh" (Auto Channel) to "On" or "Off". The setting takes place immediately, no need to press ENTER.
"On":
The selected PART on the D2 will be played by the MIDI keyboard, regardless of the MIDI Channel.
"Off":
The MIDI keyboard decides which PART will be played. You have to set the correct MIDI Channel on the keyboard.
- PART 1..7 correspondent to Channel 1 .. 7.
- PART R listens to data on Channel 10.
Then press EXIT on the D2 when done.
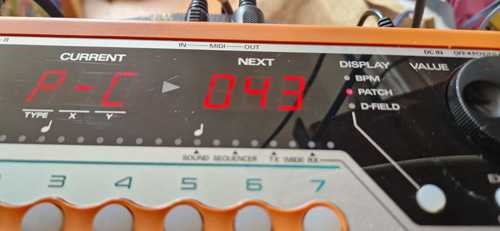
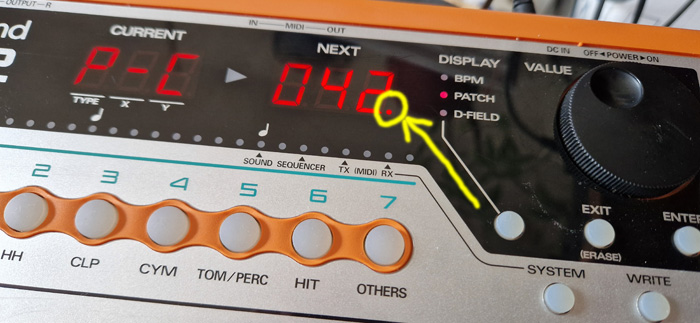
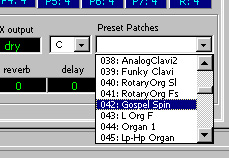
Finally, to be able to select a Preset Patch number on the D2 and also show it on the screen, press the "DISPLAY" button until PATCH LED lights up.
Then select which Part to show, by pressing the PART SELECT button and choose (for example) Part "1".
If you have set the "ACh" to "Off", set the MIDI keyboard to send the notes to MIDI Channel 1 (=Part 1 will sound).
If you have set the "ACh" to "On", you can start playing notes right away.
Now Dial a Patch Number for PART 1.
Play a note.
You can
A. study a system preset in the Editor
B. create your own preset
A. STUDY A SYSTEM PRESET
By loading a Preset Patch from de D2 into the PC Editor.
Select a preset on the D2
Make sure the D2 shows the Patch Numbers and press PART SELECT to select and show the Part you wish to use.
You select a Preset Patch on the D2 by using one of the 2 methods:
- 1. turn the Dial on the D2, or
- 2. in the Editor, select the tab "Common", select Bank A .. D, select a Preset (001 .. 127)
- however, the D2 has 88 extra presets in Bank E.
-
Unfortunately these cannot be added to "patchlist.txt", so you must select them using de Dial on the D2.
After setting the D2 to some Preset
- in the Editor, Menu: Utility > Get Patch on Current Part from MC-505
- check the LEDS on your MIDI interface. when done, press the button
To understand the workings better, you have to understand the concept of the Edit Buffer.
Most of the synthesizers implement this concept, because it is so convenient.
the Edit Buffer To load the settings of the patch into the PC Editor, you can ask the D2 to send the patch data from the D2 Edit Buffer to the PC Editor via SysEx messages through the MIDI cable. After receiving the Edit Buffer data, the PC Editor then shows all of the settings of the current patch. The changes you make in the PC Editor get immediately sent back to the Patch inside the D2 Edit Buffer. You get 2 different notifications when you have edited a setting of the patch:
|

Initialize Part 1
- Under PART, click 1.
- Menu: Utility > Initialize patch, Yes
- this Patch is also sent to the D2 Edit Buffer (see flashing Dot)
- Under TONE SELECT, Shift-Click "1" (solo)
- now only Tone 1 is edited.
- beware: other selected tones also receive the changes you make!
Part of the information below is taken from the Roland JV-1080 Manual (page 44 and further), enhanced with my own comments.
| From top to bottom (under "Tone" tab) | ||
 |
Patchname - Enter a patchname (here: "mc404Editor") - Double click to auto generate a patch name - see "wordlist.txt" in the "mc505-editor\" directory for the values Waveform dropdown - Select a Waveform from the dropdown - the selected wave will be your VCO - see "wavelist.txt" in the "mc505-editor\" directory for the 503 values of this dropdown Wave [ON or OFF] - switch this Tone active Tone or inactive Gain [-6, 0, +6, +12] Waveform group dropdown In case you noticed: the Waveform dropdown is organized in groups. The first 12 are "TB", the second 9 are "Saw", next 3 are "Square", and so on. This 'grouping' of Waves makes for fast navigation through the 503 different waves, because selecting a wave group, the first Waveform of this group is placed into the "Wave" field above it. |
|
 |
FXM [ON or OFF] color [1, 2, 3, 4] depth [1 .. 16] key range lower [C-1 .. G9] This parameter sets the key for the lowest playable sound key range upper [C-1 .. G9] This parameter sets the key for the highest playable sound |
|
 |
Tone delay mode - [Normal, Hold, Key Interval, Clock Sync, Tap Sync, Key Off Normal, Key Off Decay] Tone Delay Time [0 .. 127] - tooltip: "for Clock Sync, try a value divisible by 6" velocity cross fade depth [0 .. 127] This parameter sets the fade "width" between the upper and lower velocity ranges 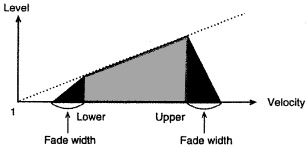 velocity range lower [0 .. 127] This parameter determines the maximum range of sound when playing softly. Sound is heard only when playing velocity exceeds the threshold (value) here. If you try to make this value higher than the setting for Velocity Range Upper, the value Velocity Range Upper changes at the same time. velocity range upper [0 .. 127] This parameter determines the maximum range of sound when playing forcefully. Sound is heard only when playing velocity does not exceed the value set here. If you try to make this value lower than the setting for Velocity Range Lower, the value Velocity Range Lower changes at the same time. |
|
Ik kan "default tempo" niet vinden.
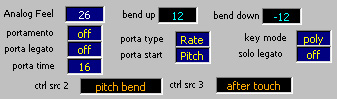 |
analog feel [0 .. 127] This parameter adds a very subtle (yet pleasing) pitch fluctuation to the basic waveform. This helps create a sound that is more natural in nature. This is also called the "1/f fluctuation". |
|
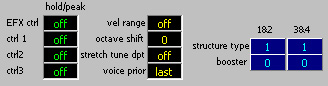 |
velocity range [off, on] This setting determines whether the Velocity Range setting is enabled (on) or disabled (off). octave shift [-3, -2, -1, 0, +1, +2, +3] This parameter changes the pitch of the Patch in one-octave steps. Tou can raise or lower the pitch up to three octaves. stretch tune depth [off, 1, 2, 3] This parameter changes the pitch using the "stretch tuning" method typically used on acoustic pianos. This makes high-range sounds slightly higher in pitch, and low-range sounds slightly lower in pitch. A diagram that illustrates the actual changes in pitch is called a "tuning curve". Changing the tuning curve causes subtle alterations is the resonance of harmopnics 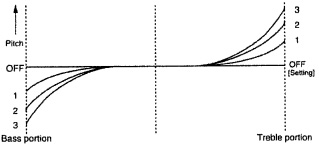 voice priority [last, loudest] This setting determines the order of priority of sounds to be played when the maximum number of voices (64) is exceeded. last: The voices played last are given priority, with earlier voices being cut sequentially loudest: the voices with the highestvolume are given priority, with quieter voices being cut sequentially structure type [1 .. 10] This parameter determines the structure of the Tones in the Patch. Differences in structure can make the sound vary greatly. This parameter determines how Tones 1 and 2 or Tones 3 and 4 are combined. With Type 1, Tones 1 2, 3, and 4 are independent. Use this type when you want to preserve PCM sounds or create and combine sounds for each Tone. - Types 3 and 4 contain a Booster in the sound path. - Types 5, 6, 7, 8, 9 and 10 contain a Ring Modulator as part is the sound path. WG = Wave Generator (VCO) TVF = Time Variable Filter (VCF) TVA = Time Variable Amplifier (VCA) 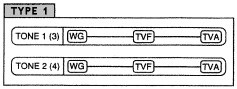 Please refer to the JV-1080 Manual, pages 43 and 44 for details. booster [0, +6, +12, +18] The booster is a circuit that distorts the input signal, by clipping the peaks of the Wave. 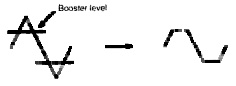 Please refer to the JV-1080 Manual, page 44 for details. ring modulator (part of structure type 5 .. 10) By combining the waveforms of the two Tones, a ring modulator can produce many harmonics (inharmonic partials) not contained in either of the waveforms. A toneless metallic resonation occurs. This works well when creating metallic Timbres, such as for bells. Please refer to the JV-1080 Manual, page 44 for details. |
|
 |
||
 |
||
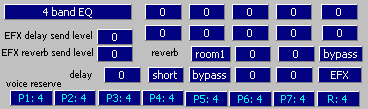 |
EFX Effect Types (=Multi-FX for the D2) This MC505-Editor does not support all of the effect types of the D2 (you can not choose the Isolator). Although the PC Editor is an amazing piece of programming work, the interface of the Editor lacks in explanation of the settings for every Effect Type. It's just 2 rows of 5 values each. This fact makes the Editor a bit hard to work with concerning the Effects section. My advice: please use the front panel of the D2 to set the Effects. It's much easier to work with. Just read the D2 manual (page 42-57). See the Multi Effects list below this table x |
|
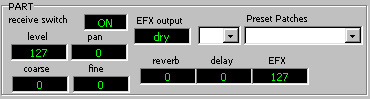 |
level [0 .. 127] this parameter sets the overall volume for the entire Patch pan [-64 .. 0 .. 63] [-64] is left, [0] is center, [63] is right reverb [0 .. 127] delay [0 .. 127] EFX [0 .. 127] |
| 25 Multi-FX Effect Types | ||||
| Effect name | Par | Long description | Purpose | |
| 1. | 4 band stereo Equalizer | 11 | This is a 4 band (high, midrange x 2, low) stereo equalizer. | modify the tone |
| 2. | spectrum | 5 | This is a type of filter, which modifies the tonal character by boosting or cutting specific frequencies. It is similar to an equalizer, but when you wish to add character to the sound, the Spectrum effect will produce a more distinctive result. |
add character to the sound |
| 3. | enhancer | 5 | By controlling the overtones of the high frequency range, this effect adds sparkle to the sound, giving it more definition. Use this effect when you want to make a specific sound stand out from the rest of the ensemble, or to give it greater definition. |
add sparkle to the sound |
| 4. | overdrive | 5 | This simulates the soft distortion that occurs when you raise the gain of a vacuum tube amp. The effect also contains an amp simulator, and produces the natural distortion that is created by sounds played through a guitar amp. It is suitable for use with guitar and synth-bass sounds. |
distort the sound mildly |
| 5. | distortion | 5 | This effect produces a more severe distortion than the Overdrive effect. It also contains an amp simulator, and produces the natural sound of a guitar amp. |
distort the sound severely |
| 6. | LO-FI | 7 | This effect intentionally degrades the audio quality to simulate a Lo-Fi sound. It is particularly effective on drums. | simulate a “low-fidelity” sound |
| 7. | filter (= noise) | 6 | In addition to a Lo-Fi effect, this effect also generates various types of noise such as hum, pink noise, and disk noise. | add various types of noise |
| 8. | radio tuning | 6 | This effect simulates the sound of a radio being tuned. | simulate a radio being tuned |
| 9. | phonograph | 5 | This effect mutes the tone and adds disc noise to simulate the sound of music played on an old record player. | simulate an old record |
| 10. | compressor | 6 | This effect suppresses loud volume levels and boosts soft volume levels, making the volume more consistent. | make the volume level more consistent |
| 11. | limiter | 6 | This effect compresses the sound when it exceeds a specified volume level, thus preventing distortion. | smooth out irregularities in volume |
| 12. | slicer | 6 | By applying successive cuts to the sound, this effect turns a conventional sound into a sound that appears to be played as a backing phrase. This is especially effective when applied to sustain-type sounds. |
apply successive cuts to the sound |
| 13. | tremolo | 6 | This effect cyclically modulates the volume to create tremolo. | cyclic changes in volume |
| 14. | phaser | 7 | By adding a phase-shifted sound to the original sound, this effect modulates the sound to add depth and a sense of rotation. | modulate the sound |
| 15. | chorus | 8 | This effect creates an impression of multiple sound sources in unison (Chorus effect), giving spaciousness and depth to the sound. | add spaciousness and depth to the sound |
| 16. | space-D | 8 | This is a type of chorus, but unlike a conventional chorus, it does not create a sense of modulation. | add transparent depth |
| 17. | tetra-chorus | 8 | This effect layers four chorus sounds to produce even more depth and spaciousness than a conventional chorus. | layer chorus sounds to add spaciousness |
| 18. | flanger | 9 | This creates a sharp and mechanical sound. It can add a metallic resonance to the sound, or produce an effect that sounds like an jet airplane taking off and landing. |
add metallic resonance to the sound |
| 19. | ST-flanger | 8 | This is a flanger that changes the pitch of the sound in steps. The frequency of pitch change can also be synchronized to the BPM. | (step flanger) add metallic resonance to the sound while changing the pitch in steps |
| 20. | short delay | 9 | This is a short delay which allows you to set the left and right delay times independently. You can also move the panning of the delay sound in synchronization with the BPM. |
add echoes to the sound |
| 21. | autopan | 7 | This effect automatically moves the stereo location of the sound. You can cause the sound to be panned left and right in time with low notes such as a Bass Drum, or in synchronization with the BPM of the pattern. |
automatically move the stereo location |
| 22. | FB-p-shift | 10 | This effect shifts the pitch of the original sound and layers it with the original sound. It can be used to play unison lines at an interval of an octave or fifth, or to layer a slightly pitch-shifted with the original sound to create a chorus effect. |
(feedback pitch shifter) skew the pitch |
| 23. | reverb | 5 | This effect adds reverberation and ambiance to the sound, creating spatial depth. | add reverberation |
| 24. | gate reverb | 4 | This is a type of reverb, in which the reverberation is cut off before the natural completion of its decay. | sharply cut the reverberation |
| 25. | isolator | 5 | An equalizer which cuts the volume greatly, allowing you to add a special effect to the sound by cutting the volume in varying ranges. The Isolator parameters are, in general, effective when applied to the following musical instruments. |
[can not be selected from the Editor]Cuts off a specific range |